Saturday, October 31, 2009

Halloween feast


I opened the paper today to the inevitable onslaught of Halloween pumpkin recipes from the classic (pies) to the modern (martinis). I actually don't like many dishes made with pumpkin outside of the usual sweet treats like pies and spice bread, and even then once-a-year is just fine. I favor butternut and kabocha if I'm going to cook with winter squash. For me, they have more flavor and stand up better to aggressive spicing. My friend and I just made a pumpkin layer cake, and the recipe substituted Chinese five-spice for the tradition cinnamon, clove and ginger. The five-spice gave a new dimension to the cake, verging on the savory. I will repeat this substitution with my Thanksgiving pie.

Winter squash is a challenge for the urban gardener: it takes up a lot of space and requires careful watering. Every attempt I have made has ended up like a scene out of some horrible eco-hipster Little Shop of Horrors: the vines grew everywhere, fruiting minimally but invading every corner of the garden, rooting at will and even growing into the siding of the garage. I have seen pictures and read descriptions of growing the squashes vertically, and supporting the heavy growing fruit with netting or even re-purposed pantyhose. This seems a little much for my low-maintenance style of gardening and I suspect even then it is gardener-versus-vine for most of the summer. Fortunately, while we don't have a farmers market in our immediate neighborhood, we do have a family farm truck that shows up once a week from Michigan. This time of year, the pick-up is weighed down with piles of winter squashes. For a dollar, I can pay the farmer directly for a nice, heavy squash and thus avoid the summer nightmare of hacking back insidious squash vines like an Amazonian explorer.

Here is my favorite dish with winter squash, and one that is a real crowd-pleaser. I assume my readers are experienced cooks, so I have not elaborated on the exact process of how to fill the ravioli. I also am using my main concession to the time constraints of my life: wonton skins from the market instead of rolling my own pasta dough. I own a pasta roller, and do make my own pasta once in a while, but I admit that I actually like this recipe better with wonton skins. The filling is so rich and heavy, that the ethereal wrapper seems more appropriate. The pale white eggless dough also shows off the beautiful orange-brown color of the filling.

BUTTERNUT SQUASH RAVIOLI

1 butternut squash
1 tablespoon coriander
1 tablespoon oregano
large pinch fennel seed
large pinch crushed red pepper flakes
1 teaspoon salt
1 teaspoon ground black pepper
2 cloves of garlic, minced or garlic-pressed
1 tablespoon olive oil
1 egg yolk
1/2 cup grated Parmigianno cheese
Wonton skins
4 tablespoons butter
8 sage leaves, torn into pieces

1. Preheat oven to 400. Cut squash lengthwise into 6 skinny wedges, and scoop out seeds. Do not peel.

2. Mash the spices, garlic and oil together in a bowl to make a coarse paste. Rub all over the squash wedges. Place on a baking sheet skin side down and bake until soft, about 45 minutes. Let cool.

3. Scrape out flesh from peel and discard peels. Mash the squash with the egg yolk and a 1/4 cup of the cheese.

4. Put a tablespoon of filling in each wonton skin and seal with water (freeze here if you want -- works great!). Cook in well-salted boiling water 5-7 minutes.

5. Melt butter gently in a small pan and add sage. Allow to infuse for several minutes over low heat. Scoop ravioli from the water and place on a large platter, don't drain too thoroughly, you want some moisture to lighten up the sauce. Pour over the sage butter and turn gently. Sprinkle with remaining cheese.

Wednesday, October 28, 2009

Front bed in peril


When I was in college, I lived in Bolivia for 6 months. There was no available mid-semester storage, so I had brought most of my earthly possessions: books, clothes, CDs, etc. More stuff accumulated over the course of the 6 months, and as I headed back to college I was burdened with three large duffels, all of which required extra payment for being overweight. When I landed in New Jersey, none of my bags appeared on the baggage claim. My instant reaction was utter and total relief. Nearly everything I owned had disappeared. I wasn't at all sad or regretful. I imagined buying a small amount of new clothes, and slowly replacing my books, burning borrowed CDs. My whole life could be edited, reinvented on a smaller scale. Of course, everything eventually found its way to me a few days later, but for a few days I walked around light as air.

A similar feeling came upon me as we talked to our contractor a few nights ago. Our front porch is being demolished and replaced, and as he sat sketching out the game plan for an expedited job prior to the winter cold, I realized my front garden bed was toast. I looked at him, trying to conceal my hope: "Will all my plants be destroyed?" I asked. He looked uncomfortable. "We'll do our best to not damage them", with the same aspirational tone he had used when he told us the whole porch was to have been finished within two days, a month ago. My husband glared at me and went back to discussing the finer points of permit acquisition. Once again, the baggage had disappeared. I imagined a new bed, prettier, more well arranged, less haphazard.

Right now our front garden bed is a complete mish-mosh, mostly plants orphaned by the previous owner of the house, with two peonies thrown in by us the first year. The one beautiful specimen, a deep magenta rose, succumbed to some blight late last year, and did not bounce back this summer as we had hoped. As we spend most of our time in the backyard and only enter the house by the back door, I always focus my burst of spring and fall gardening energy in the rear of the house. By the time I consider the front, I am tired, and figure I'll just leave well enough alone. Of course, when I approach my house by the street instead of the alley, or when we have friends over who will enter by the front door, I feel sad about how the front yard only enhances the ragamuffin appearance of our home. With our listing porch now hopefully a thing of the past, I expect to feel newly inspired to actually put some thought into the front. It is like losing 20 pounds and going out for a new clothes shop.

If they survive the onslaught of construction, I will keep the peonies, and add more. They look great, even when their flowers are gone, and seem to thrive on total neglect. After that....who knows? While my husband gives me total reign in the back yard, I have a feeling he'll actually care about the choice of plants in the front, so likely I will find a time for us to sit down together and pore through the garden books. Our usual disagreement revolves around color choice. I like whites, pale pinks, delicate yellows. He likes a bolder, hotter color palate. One exception to my color taste is the slim bed edging our front fence: I put in California poppies the first year, and now they self-seed with abandon. I love their delicate foliage and their beautiful cheery colors. Although I'm sure I could plant something more sophisticated, they edge the fence happily with minimal care. And this is one plant that I know will come back no matter how many boots trample on the soil, or how much the bed is disturbed by planks and debris.

Monday, October 26, 2009

Perennial bed redux


I spent all morning in a rainy, cold October garden editing the bed that sits against the fence on the north side of my back yard. I dug out plants, divided them, and tossed out the ugly specimens. The best discovery was how much the quality of the soil has improved with 3 years of composted mulch and organic practices. I remember digging through the bed when we first bought the house. It was packed, clay like soil, with almost no sign of life except overgrown invasive ornamental grasses. Now I came across mounds of wiggling earthworms, spiders, ladybugs, and other creepy crawlies. The soil now feels spongy and much less compacted.

The bed is long, probably 30 feet, and narrow, a little more than 2 feet deep. A garden designer would counsel me to make it deeper to improve the proportion of the bed against the height of the fence and to create different levels of eye-catching foliage. Alas, it is bordered by a narrow packed paver-stone path that I have no interest in moving at present, despite its exceptional ugliness. Indeed, the whole layout of my back yard offends my aesthetic sensibilities --all straight lines. There is a hideous square of lawn and a dwarf magnolia tree placed smack in the center of it by the previous owners. I wanted to get rid of that tree the first year, to open up the yard and be rid of the hideous symmetrical layout. But we happened to move in at the peak of its flowering and it was so achingly pretty I couldn't bear to do it. And now I have simply grown accustomed to it, and it is well placed in front of our rear window, so my little one can bird watch in the mornings. Almost on a monthly basis I resolve to chop it down, and then I relent.

Back to the bed: if I had better computer skills, I would be able to publish a fancy graphic representation of my new layout. Alas, I have neither the skills nor the time to learn them. So I will walk you from east to west down my bed, starting at the house:

Lilac (three years old, still very small)
Semper vivums (on a rock pedestal)
Spirea
Bearded iris
Echinacea
Lilies
[space - plan: blueberries]
Echinacea
Coral bells Heuchera villosa
Phlox
Lilies
[space - plan: espalier fruit tree]
Bearded iris
Lilies
Spirea
Bearded Iris

The bed is edged with violets, although not completely yet. I have two trellises against the fence as well. I previously had clematis growing on them, but both plants died. It may have been that I pruned them incorrectly, but they never flourished, so I suspect it had more to do with the environmental conditions. I am considering hops, but I need to investigate further -- and they were on back order all last season. The rest of the fence usually supports scattered morning glories, self seeded from the years before. Large purple alliums also are scattered throughout the bed. I am excited to see my new bed next summer. I hope my late-divided plants will grow in the spring, and if not, I have a long list of annuals I am dying to try. Either way, it will be an interesting summer.

Sunday, October 25, 2009

Dividing fall plants


As usual, time has flown by and we are now in late fall. I still haven't divided my big, overgrown clumps of lilies, bearded irises, phlox, hostas and echinacea. I marked them all carefully and made a mental note to divide in September, and then ignored it. Of course, I was busy, but I also didn't quite know what to do with all the plants -- I didn't have a game plan, so I avoided the chore. I have some holes in my beds that I need to fill, but in general, my garden space is precious. Yet I can't imagine throwing them out! I could give them away, but I'm so late with dividing who will want the extras? Who wants my cast-offs anyway? This may all be a moot point...I'm not even sure how well the pared down plants will do this late in the year, so perhaps I should just dig, divide and see what survives in the spring.

The budding garden designer in my head is telling me that I should edit out some of the single specimens I have floating in my beds like lonely orphans.... a beautiful clump of healthy hostas will always look better then three or four ill-matched and scraggly plants from the perennial sale table at the nursery. I can never resist...I see them sitting forlornly on the table, and how cheap they are, and decide I can squeeze them in. A bad move for so many reasons, especially since the colors and foliage usually aren't harmonious, and the bed ends up looking very haphazard. Moreover, these are not the choicest products of the nursery. In a small space, only the healthiest plants should be featured, as every shortcoming will visible. There are no sweeping fields of color or deep beds of foliage to hide the occasional dud. I would never buy edible produce bruised and past its prime....so why are my standards lower for plants that will last much longer?

Tomorrow I will bravely take spade and saw to the denizens of my garden. I will remind myself over and over that these were all small little plants a few years ago, and they have grown mature and full quite rapidly. If half a hosta or a few lily bulbs end up in the compost, so be it. The main plant will be healthier for the trim. I will replant what I can, attempting the massed effect advised by garden gurus. Worst case scenario, none survive, and I have more space to play with in the spring. But nature is feisty, and I suspect that if these plants have made it through wan urban soil and a neglectful caretaker thus far, they will probably live to fight another season. As Annie Dillard wrote in Pilgrim at Tinker Creek,

"The way plants persevere in the bitterest of circumstances is utterly heartening. I can barely keep from unconsciously ascribing a will to these plants, a do-or-die courage, and I have to remind myself that coded cells and mute water pressure have no idea how grandly they are flying in the teeth of it all".

Saturday, October 24, 2009

Fast food


Three times a week, I work late, usually not arriving home before 6:30 pm. As the primary cook in the house, my energy level usually determines dinner. If I am willing to cook, we eat at home. Otherwise we go out. My husband does not enjoy cooking and, if left in charge of dinner will opt for purchasing it, unless I leave specific and easy instructions on reheating something I've already made. This used to be less of a dilemma for us - but with a young child, eating out is not relaxing. If he is is tired and hungry, it usually ends up requiring more energy to wrangle him at a restaurant than it would have to chop up some stuff to stir-fry.

My transition to being parent as well as a cook has transformed my approach to dinner. I used to never make the same thing twice, working my way through a new recipe almost every night. If it took two hours, it didn't matter -- my husband could eat something to tide him over. But I get home now to a tired toddler who wants me to pay attention to him and not a cutting board. And I am learning that a repertoire of meals that we eat on a regular basis is very comforting to a toddler's mind...and perhaps to adults as well. But I cannot bring myself to use garish 30-minute meal suggestions that involve dumping several highly processed foods into a pot and stirring. I still want to cook from scratch, and cook my food: slow, healthy, tasty and based on my garden products, or seasonal vegetables. The freezer is my best source of fast food. Cooking ahead and freezing pizza sauce, bolognese sauce and pesto has given me three reliable meals that I can always fall back on. I've learned too that I can keep pizza dough "rising" in the fridge for a few days with no ill-effect; indeed a baker might say I am developing flavor by retarding the rising. Pesto is the most efficient: a frozen half cup of the stuff can be quickly thawed, beaten with some butter and cheese, and on the table in the time it takes to boil pasta.

Pesto is often rolled out in cooking magazines in August as a garden-based sauce for every home cook to try. It has gone from highly trendy to cliche in the fancier food circles, but it still tastes good. Pesto is also quite sturdy and freezes beautifully. Food history is always of dubious reliability, but I like to think of the oft repeated anecdote of the Genovese soldiers who went into battle with a pot of the stuff in their bags. I like pesto more in the late fall and winter -- a memory of my summer garden, of basil plants composted long ago. There are myriad recipes, but the idea is simple: basil leaves, olive oil, salt, and garlic. Pignoli or walnuts optional. If you want to break out the mortar and pestle, all power to you, but I really can't taste the difference. If, like me, you are making 12 cups in a single day, the Cuisinart is a far better choice. I use Marcella Hazan's recipe, and she instructs to stop here if you are freezing. When you are ready to use it, add some butter and cheese: she prefers a mix of parmagianno and romano. Make a lot. Everyone likes it. Everyone takes seconds.

As for the type of basil, I generally use the big leafed sweet basil that every nursery sells. The plants grow like trees by late August, and I can get three big batches of pesto in a good season. I have not been successful growing basil from seed here in Chicago. By the time the plants get up and running, even if I have started early indoors, the season is almost over. Thai basil doesn't work -- too much licorice taste; better to use it whole in stir fries. I read in a cooking magazine that Genovese pesto tastes better because those folks use the small leafed Genovese basil variety. The writer said the small leaves give more concentrated flavor. I grew two of those plants this season, and the only difference was that it was a much more tedious task to strip the leaves off the stems. Maybe the superiority of the Genovese pesto has more to do with terroir than with the exact type of basil they use.

Finally, pesto from basil grown in the garden is cheap. I have served it to friends who think of it as a luxury item, since to make pesto from Jewel Osco would require 15 dollars worth of their sorry, wilted and overpriced leaves. Of course, there is a price for the pignoli and the Italian cheeses, but it is spread out over 3 months worth of meals, and is cheaper than one night out at a restaurant.

Thursday, October 22, 2009

Investing in long-term projects


I have been gradually clearing summer debris from the garden, and am forced to face my biggest folly of the summer: a plastic grape arbor. When I initially stuck the grape vine in the ground a few years ago, it was admittedly after a bargain-basement impulse buy at a big-box store. When the grape vine started to flourish, I knew I needed better support than the little trellis I had provided originally. But I balked at the time and expense of building a strong, solid wooden arbor. Was it worth it? We'd probably be moving in a few years, I was busy...I'd just get something pre-made. I spent a hundred bucks on a silly plastic arbor that was overwhelmed in one season and now has a laughable rigging of bricks, string and wire to hold it up against the forceful embrace of the vine. I spent more time agonizing over this piece of junk and rigging silly repairs for its flimsiness than I would have if I had just started the project right with a solid wooden arbor. In hindsight, I can't understand my fear about spending two hundred bucks and a weekend of work for something that would have lasted.

Similarly, I have been avoiding pursuing my latest obsession: espaliered fruit trees. Ever since I laid eyes on the magnificent examples in the Chicago Botanic Gardens, I have been itching to try it. The back of my house would be perfect to espalier a quince or apple, and it is a time-honored urban gardening technique. But, as each year goes by, I think, "I didn't start it my first year here, so what's the point? I'll probably be moving in a few years anyway, so I'll never get fruit from it, it will never look nice". In stark contrast to generations past, I simply assume I will be moving on at some point, that this is not where I will stay. Part of this is just our nomenclature of a first home... "a starter": a stepping stone to something better, to permanence. When I move to my real home I will start long-term projects.

I have tried the gardening techniques promoted by Mel Bartholomew in the "Square Foot Gardening" manual. His approach is particularly child-friendly and it offered a way to garden on a patio that my husband didn't want to remove. I did bristle at one of his many promotional points in his book, which reads more like an infomercial than a gardening manual. He talks about the "seven-year itch": it takes on average seven years for gardeners to improve existing soil and the average home-owner moves every seven years. "Seven years worth of effort lost", writes Bartholomew. His conclusion: garden in easily removable raised beds. Now, this makes no sense to me. It is not time lost: you have conditioned the soil, made it more animal and plant friendly, safer for children to play in, and composted waste that would have ended up as methane in in a landfill. And this seven-year outlook also assumes that the owner who follows will not garden or if they do, it has no direct benefit to you if you give them rich, organic soil. I believe there can be small acts of land stewardship, and improving urban soil is one of them, whether you are a renter or a fleeting owner of the tract.

I regret not planting fruit trees the first year I was here, or putting in a serious grape arbor that would have lasted twenty years. It stemmed from similar wrong-thinking about who would benefit and what the immediate reward for me and my family would be. And who knows....maybe with the economy and job availability this will morph from our starter home into a home in which we raise our family over decades. So maybe I will start my espaliered fruit tree project next year. If we sell in a few years, maybe a dedicated gardener will buy the house and continue on. Or maybe I will stay here long enough to see a mature tree, despite the best-laid plans. Or maybe the next owner will rip the whole damn thing out, but I will have gained skills that can be transferred to a new project, at a new house. And even the idea of gardening as stewardship is taking the short view. I meditate on the writing of Wendell Berry, who wrote:

"..Plant sequoias.
Say that your main crop is the forest
that you did not plant,
that you will not live to harvest.

Say that the leaves are harvested
when they have rotted into the mold.
Call that profit. Prophesy such returns.
Put your faith in the two inches of humus
that will build under the trees
every thousand years."

Tuesday, October 20, 2009

Sauerkraut for the winter


For the past 10 years, I have lived in profoundly urban settings: Manhattan and Chicago. It is has been virtually impossible for me to survey my land and living space and imagine how the area looked when it was wild, or when it was pastureland. My trip to New England reawakened my historical imagination. Hiking through the woods, surveying old stone walls and foundations, finding old apple trees in overgrown land, the past history of the land bubbled into my consciousness. It was easy to feel what the the land looked like before Route 4 and gas stations. My heightened sense of history also brought a heightened sense of the anxiety one must have felt at the onset of winter. I imagined being a European settler, standing in the root cellar, surveying the stockpiles of vegetables, preserves, and cured meats and thinking "Well...this is it. Hope I have enough to get to late springtime". What fears must mothers have had looking at their young children and rationing portions early in the winter, just to be sure there was enough to last through March.

For all of my commitment to slow food and local eating, in the end I know that the store is just a quick walk away, and there is a vast hinterland systematically shipping food to my urban center all through the winter. And who am I kidding? I don't just shop when supplies run low, but when gastronomic boredom sets in. It is one thing to have enough sauerkraut and salt pork to survive, but it is another thing to eat it every day for 4 months. Seasonal eating often means months of the same food. Even in that bountiful month of August, my family tires of basil and tomato salad every day. Of course, nutritionists might argue that there's an upside to gastronomic boredom. We then tend to eat what we need, and no more. Studies show that the more we stray from seasonal eating, and the more we have access to what we feel like eating whenever we want, the higher the rates of obesity. A little bit of winter rationing and gastronomic boredom might go a long way to improving our overall health. And, the benefit of a seasonal diet is that those tomatoes are going to taste amazingly wonderful when they finally arrive, a stark contrast to old potatoes and spring greens. The changes of the season will be more exciting and more vivid than anything we experience now.

These historical musings made me return to one of my favorite cookbook writers, Elisabeth Luard, and specifically her classic reference The Old World Kitchen. For anyone who is half-cook, half-anthropologist, the book is a must-read, filled with treasures that I have never found elsewhere, despite a lifetime of voracious recipe gathering. My particular favorite is her recipe for a barrel of sauerkraut -- a recipe she herself tested. This woman is a kindred spirit. What did she do with all of that sauerkraut? She wasn't facing a cold, resource-poor Bavarian winter. Her kids must have rued the day that barrel was first rolled out.

On much a smaller scale, I just put up 4 pints of sauerkraut from a single head of cabbage I bought at the farmers market 6 weeks ago. Sauerkraut is easy to make: shred fresh cabbage, salt it with pickling salt and stuff it in a clean crock. The next morning, inspect the crock and see how much brine was formed. If the cabbage is not completely submerged, than mix more pickling salt in water and add to the crock (precise ratios and measurements can be found at http://www.freshpreserving.com/ ).Traditional recipes call for weighing the cabbage down with a plate, but the more modern solution taught by Eugenia Bone appeals to me: fill a gallon ziploc with brine and use it as a weight. Leave it in a cool place, and slowly over 3 to 4 weeks it will ferment. You will see bubbles rising to the top. When the bubbles stop, it's ready to be eaten or canned. I used a raw-pack method and processed my pint jars for 20 minutes in a boiling-water canner. My husband is already concerned about our 4 pints. We'll do a hot dog night at some point, and maybe a German party: sauerkraut, sausages and wursts, beer. "And then what?" he asks, "What will we do with all of this?". He's lucky I couldn't find a barrel.

Monday, October 19, 2009

Fall Compost

Today I am mulching the garden with this year's compost. I have many books and articles that give long, complicated instructions for composting, exhorting me to achieve the texture of a wet sponge, to layer exact amounts of brown and green material, and to adhere to precise turning schedules. One leaflet even recommends purchasing a special thermometer to take the temperature at the center of the pile. I do not have the time for this hands-on management approach -- apparently you get rapid results and rich, coffeeground-like material within weeks. I do have patience, so I am a slow, cold composter. Usually I end up with a mostly-broken-down melange that I can then use as my over-winter mulch. It has always broken down well by spring time.

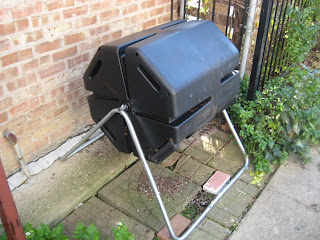
I now have two bins and as winter sets in, I'll empty them on to my garden and then cram both of them full of fall debris. My longest relationship is with a black recycled plastic square bin composter. It is partially buried and was advertised as rodent-proof, and over three years this seems to be the case. My new acquisition is a tumbler composter....results pending. Apparently things work quickly in the barrel if I add some ridiculously expensive "compost activator" from the garden supply company. My guess is that I can toss some semi-broken down junk from my other pile, like a sourdough starter, and let nature take its course.

The tumbler is clearly appealing to a toddler: my little one is ecstatic about his new chore of turning the compost ferris-wheel style morning and night. It is more unsightly than the square bin. I am pondering the best placement for the tumbler, as it also has a large footprint with the metallic support frame. The square composter sits next to the back of the house, and with an exuberant border of (well-fed) dusty millers, it actually pleases the eye, the dark black setting off the beautiful silvery foliage.

Of course, the inevitable project is vermiculture. Thus far I have resisted the worm bin, mostly because my current composting scheme works for me. The appeal I can see is not having to schlep out to the compost bin with kitchen scraps on cold winter nights. I know, I know, you can keep stuff in the freezer and dump it as a batch. But there's no space in my freezer -- it's filled with chicken stock and tomato sauce. I could keep a large plastic bin under the sink. But that inevitably stinks -- and makes my green-by-convenience husband rethink his commitment to composting. And if I am filling a large plastic bin under the sink, why not throw some worms in? It would control the stink according to the evangelical worm literature. Okay. Maybe I have just talked myself into it. But now I suspect it is too cold to get worms shipped to me via the mail. Off to find a local source...

Friday, October 9, 2009

New England bound

I'm off to Vermont and New Hampshire for the next week and will not be posting until I return. In the spirit of my trip, I wanted to discuss my current favorite garden writers, Joe Eck and Wayne Winterrowd. These men design and care for a garden in southern Vermont called North Hill. I have never seen it in person, but I have walked the landscape in my mind for hours while reading their beautiful prose. To call them garden writers seems a little silly, like calling Anne Lamott a religious writer, or M.F.K. Fisher a food writer. They are all simply good writers, who happen to have a specific subject. More interesting to me is that Eck and Winterrowd write together and their shared voice is amazingly fluent and crisp. I have never come across their equal in this regard.

Each man has written separate books: Mr. Eck is the author of the essential Elements of Garden Design, and Mr. Winterrowd wrote the definitive American reference book on annuals. My favorite books are those that are co-authored, A Year at North Hill and Our Life in Gardens. They have another book about cooking seasonally from the garden that has become my great white whale....I persist in searching high and low for a reasonably priced used copy. I have a feeling that once I stop looking for it, a copy will bubble out of the universe in an unlikely place, like a book swap in a bar or a garage sale in my neighborhood. Until then, I return with alarming frequency to the works that are available in the Chicago Public Library.

Their books are almost impossible to read straight through. It would be like eating my favorite French chocolate torte in one sitting: too rich and too indulgent. That being said, see the recipe below. I am a fast reader, blazing through books in a night or two, but these are books that make me slow down. I savor them, rolling their words like wine on my tongue. I first read their books while I was nursing, and each chapter lasted just about as long as my baby's appetite. These two fed my mind in the same way.

I have a short list of books that I read every year or two, each reading a homecoming to a kindred soul: Lolita by Nabakov, The Things They Carried by Tim O'Brien, The Art of Eating by M.F. K. Fisher, Angle of Repose by Stegner, Jane Eyre by Bronte, Pride and Prejudice by Austen and The Mambo Kings Play Songs of Love by Oscar Hijuelos. To this list I have now added both A Year at North Hill and Our Life in Gardens. Eck and Winterrowd inspire not only the gardener's imagination, but also the creation of a life lived exactly as you want, mud and all.

French Chocolate Torte

10 oz bittersweet chocolate, chopped
1 cup unsalted butter, cut into small pieces
5 large eggs
1 1/4 cup sugar
5 Tbsp flour
1 /2 tsp baking powder

1. Preheat oven to 325. Butter and flour a 10 inch spring form pan

2. Melt chocolate and butter in a double boiler, mix until smooth and put aside to cool slightly. Beat eggs and sugar in a large bowl until light and fluffy.

3. Sift flour and baking powder over the eggs and fold in. Fold in chocolate, and pour batter into the prepared pan.

4. Bake cake 20 minutes. Cover pan with foil and bake another 30 minutes. Remove from oven (cake will be slightly underdone) and remove foil. Let cool in pan. Cake will fall as it cools. Serve in slim wedges with some whipped cream.

Thursday, October 8, 2009

The pleasures of fast-growing vines


Today is a cold, rainy October day in Chicago, one more suited for poring over seed catalogs than actually being in the garden. It was a cold, short summer for us here, even by Chicago standards. Many of my summer annuals had delayed or stunted growth this year. The more fancy garden books I check out of the library, the more I realize that annuals are a little uncool in the high-falutin' gardening circles. It seems like a mature perennial garden is the ultimate goal of most landscape designers and garden gurus. But I love annuals! It is amazing to see something grow from seed in one short season and they add color and interest to perennial beds, especially in the shaggy days of late August. On this cold, rainy day in October, I want to salute my arsenal of annual vines in particular. Against all odds, after a very long germination and late late summer start, my little fighters are twining their way up my fence as best they can before the frost comes.

I will always have morning glories in my garden, as well as the scarlet runners I wrote about a few days ago, but my two favorite vines are the cardinal climber, Ipomea x multifada, and the black-eyed susan vine, Thunbergia alata. The cardinal climber is gorgeous mostly for its deeply-cut dark green foliage. It also puts forth a burst of red trumpet flowers that bring to mind the tropical Carribean. Last summer, it created a thick wall of growth along my front fence that caused many neighbors and pedestrians to stop and admire it. Many of our Puerto Rican neighbors said it reminded them of their island. This year, the weather conspired to make it a short, anemic season for my Cardinal Climber, but even now it is putting forth its palm-like leaves. It gives me a pleasant jolt to see such a lushly tropical plant growing in this cold rainy weather. I am looking forward to a better growing season next year, and perhaps some hummingbirds, as this vine is known to be a favorite.

The black-eyed susan vine is slow to germinate, but once it gets going it twists and winds its way quickly along any nearby fence or branch. It gives sunny yellow flowers that one can't help but love, simple though they may be. This year, I hoped to mix them amongst my cardinal climbers, a sweet yellow flower winding its way along the tropical fronds of the other vine. Neither one got an early enough start, but next year, hopefully, I will achieve the desired effect.
Someday I will work on the wisteria, hops and other perennial vines that gardening books lovingly photograph. My annual vines are amusing me for now, and they add some excitement to my gardening year. Finally, in a small urban garden, vertical elements are hard to incorporate -- more than one or two trees means sacrificing almost all available sun and soil. The annual vines, trailed upwards along fences, roofs, and arbors add vertical interest without the sacrifice of precious garden space. Maybe next year I will build a wire house, just the right size for a three year-old boy, and train all my vines along it. By late summer, he'll have a quiet green retreat --something to soothe his little soul and maybe cultivate vine-love in him too.

Wednesday, October 7, 2009

Chicago Autumn Banh Mi

The West Side now has its own Banh Mi restaurant....Bon Bon, on North right past Western. The service is iffy and the sandwich quality highly variable, but the price is right and the atmosphere genial. We have gone a few times, but I always think that I could produce a better sandwich at home with minimal effort.

If you don't know Banh Mi, it is a Vietnamese sandwich made on a wheat and rice flour baguette. It is stuffed with pickles, hot peppers, vegetables, herbs, various proteins, and topped off with a slathering of mayo. They are amenable to improvisation and generally better than a standard "Italian" sub. Traditionally the pickle is made with matchsticks of daikon radish and carrots. While this is delicious, daikon radish pickle presents a dilemma for the home cook -- the fridge, indeed the entire kitchen, is usually permeated with a funky fermenting radish smell that takes days to dissipate. I imagine this is not an issue in the open air markets of Vietnam, but the aforementioned restaurant bathes patrons in this unique odor upon entry. I came upon a solution to this odor dilemma earlier this year, when my sisters hosted an informal "Iron Chef: Santa Fe". I went up against one of their boyfriends and a neighbor and it was "Battle Apples". I decided to make three southeast Asian dishes, and one was a Banh Mi, with an apple-based pate and apple pickle substituting for the daikon. It was a rousing success, and I have never looked back. P.S. I won.

So, here is my riff on Banh Mi, featuring products from my garden and the local farmers market. Please note, the bread matters here -- the overly chewy French baguettes a la Whole Foods are not appropriate. The bread needs to be shatteringly crisp on the outside and very pliant on the inside. The rolls and loaves you can pick up at any local Mexican panaderia are much closer to the real thing. This is less a recipe and more a list of suggested ingredients

Chicago Autumn Banh Mi

Crisp baguette
Slathering of Mayo
Cucumber slices
Quick Apple-Chicken Liver pate (see below)
Quick Carrot-Apple pickle (see below)
Lettuce
Cilantro
Mint
Strips of serrano peppers

Quick Apple-Chicken Liver Pate

2 spoonfuls of oil, bacon or chicken fat, or butter
1 large onion, sliced thin
1-2 apples, sliced
1 pint container chicken livers, cleaned
Salt and pepper to taste
Pinch Chinese five-spice powder

1. Heat the fat in a saute pan, cook the onions until translucent, add the apples and cook until soft but not mushy. Scrape into a food processor, add a little more fat to the pan and saute the livers until slightly pink in the middle. Season with spices to taste.

2. Process to a chunky paste and let cool in a bowl. If you want to save it, pack into a bowl, smooth the top and pour a thin layer of melted butter or fat over the top. Refrigerate.

Quick Carrot-Apple Pickle

2 apples
2 carrots
1/2 cup white vinegar
1/3 cup sugar
1/2 tsp salt

1. Peel and cut the apples and carrots into uniform matchsticks.

2. Stir the vinegar, salt and sugar until dissolved and add the carrots and apples. Toss well and let sit for 20 or so minutes until pliant.

Tuesday, October 6, 2009

Three successful new plants from this summer's garden


As a gardener, this chilly time of year always threatens to become the winter of my discontent: I look back over my summer and consider the diseased roses, the cosmos that took over my beds, the pumpkin vines that were the victims of an accidental (so he says) mowing by my husband. In a few more weeks, after everything is mulched and composted, I'll have a change of heart and begin again with my grand plans for my little plot of earth. I did have three excellent showings this year by new plants in my garden. Of course, when you have a cramped urban garden, one's heart sinks a little when you gather three new things onto your must-have list. Adding to your list inevitably means editing out other plants, for as Joe Eck wisely advises in his beautifully written Elements of Garden Design, "The smaller the garden, the fewer will be the number of species that should find a home in it....the smaller the space, the more the eye will need to rest on ample, extensive masses of plants". Sigh. Here are my three new loves from Summer 2009, all of which are easy and rewarding:

1. Alpine strawberries

Thomas Jefferson had a passionate love affair with these small, delicate fruits; I first encountered them in Italy, covered in Prosecco as a light dessert. They are beautiful plants and delicious to nibble, a mix of intense strawberry and pineapple flavor. While the plant bears the fruit cheerily from June to October, the strawberries are quite small. I now appreciate that the dessert bowl I ate so quickly likely represented about twenty plants' worth of fruit.

I initially tried to grow these from seed a few years ago using a packet of "Mignonette Strawberries" from Renee's Garden Seeds. I was warned they were slow to germinate, but I never saw any growth but weeds in the intended patch for the entire spring and summer. So, this year, I secured two small plants in the Herb section of Grand Street Gardens. Both plants took well to the sunny corner of my herb patch and happily bore small, delicious fruits all season. I am going to mulch them with a generous layer of straw this winter, much like my Ozark Beauty strawberries. I do wonder if mulching is really necessary given the "alpine" half of the plant name. But I don't want to experiment and potentially lose the output of one of my plants next season.

2. Scarlet Runner Bean

My child loves birds, especially owls, but his little eyes linger lovingly on the hummingbird pages of the bird guide as well. I have a need for vertical growth, not just because I am short on space, but also because the back of my house faces a tall white expanse of garage. I had initially planned on growing hops up the garage wall this year, but all the mail-order sources I found had them on back order. So I decided to go for hummingbird-friendly annual vines, and the best one I planted was the Scarlet Runner.

The Scarlet Runner grew fast and furious, and my main mistake was putting in short six-foot trellises. Next year, I'm going to trellis the whole 12-foot wall. It produced beautiful but small red flowers, several vines of which I trailed from my flower arrangements with nice effect. Then it produced huge big flat green beans. Apparently you can pick and cook them like pole beans before they get fuzzy, but we were too busy with the Blue Lake pole beans we planted in the raised beds. Best of all -- especially for toddlers -- the mature beans are gorgeous: big, black and speckled with brilliant hot pink. They look straight out of a Jack and the beanstalk story. For this alone, they are a worthy addition to a child's garden: my toddler is now a committed seed saver after seeing what he gets to collect.

3. Lemongrass

I cook a lot of southeast Asian recipes for my family, and lemongrass was the perpetual ingredient challenge for me. On the west side of Chicago, we have some small Chinese markets and a large Korean grocery store, but I have yet to find a Thai or Vietnamese store. For that, we have to go all the way up to Argyle. So I was excited to see a small, cheap lemongrass plant at City Escapes. I stuck it on the "Asian" side of my herb bed, along with the perilla, the holy basil and garlic chives. It grew into a beautiful ornamental tuft of grass. This lemongrass was a culinary revelation: I was used to wrangling those tough dried-out tusks of lemongrass from the market. Not only was the flavor more intense, but it was easy to chop. I also got the grassy tops, which apparently are rare to come across if you don't grow it, even in Vietnam. Next year, I am going to use it as a grassy effect in my perennial bed....no one needs to know it serves double-duty on the dinner table.

Here is a recipe for the rare grassy tops, adapted from the invaluable cookbook Real Thai by Nancie McDermott:

Lemongrass-ade

A generous handful of lemongrass leaves, cut into two inch lengths with scissors
3 cups cold water
3 tablespoons super-fine sugar (or, if you want to be fancy, a 1/4 cup simple syrup)
Ice cubes

1. Pack the leaves into a blender then top with the water and sugar. Blend for 1 minute. Strain into a pitcher.

2. Taste, adjust for sweetness, and pour over ice.

Monday, October 5, 2009

My container-grown fig tree


My interest in fig trees began a few years ago when someone sent me an old copy of Carla Emery's Encyclopedia of Country Living. If you haven't read this book, I highly recommend it. It is an eccentric collection of hippie back-to-the-land lore, with the life story of the author sprinkled amongst the entries. Carla wrote enthusiastically about planting figs in pots, especially in northern climates. When the cold hits, you can bring the pot into the cellar for the winter. In my Internet research, I also read the magic words for any garden experiment: "easy to maintain as long as you don't over-water". Yes, yes... any plant that thrives on my hatred of the hose is welcome in my plot.

I selected the kadota fig, as it was billed as sweet when eaten fresh and also dries and cans well. Several sites also mentioned that the bright green color of the ripe fruit makes "them invisible to birds". I am not sure if that's true, but given that the birds made away with most of my grapes last year, I was willing to test the theory.

The tree did great in the pot, placed in a paved sunny corner of my front yard. My harvest was nil this year. I'm not sure if it was due to the first year of growing or the cool "summer" weather in Chicago, but even though the tree grew about 25 figs, none of them ripened before the October cold hit. My son still liked pulling them off the tree and watching the milk white sap ooze out. Another problem may have been that I planted the tree in too large of a pot -- apparently with figs, this encourages leaf rather than fruit growth. Per instructions on various garden websites, I have stopped watering all together and am waiting for the tree to go dormant and drop its leaves. Then I will move it into the unheated area of my cellar and wrap it in an old blanket. Hopefully next year we will have a big enough crop to make some homemade fig newtons!

In honor of my baby tree, I did pick up some organic dried kadota figs at the market and I canned them in a brandy-laced simple syrup with a recipe from Eugenia Bone. They are seasoning now, and I plan on sampling the product at Thanksgiving. If they turn out well, I will post the recipe.

Sunday, October 4, 2009

Good-bye garden and hello homemade liqueurs


Today was pretty much the last day of the edible garden. In years past, I have had the energy and foresight to plant a cold-weather garden of radishes and greens. This year work and family conspired to let my summer garden die a slow, scraggly death. Still, this week I got 10 pounds of grapes off my two year old Concord vine, 6 quarts of brussel sprouts and 2 final succulent pounds of Blue Lake Pole beans. I cooked and canned the grapes with Eugenia Bone's recipe for Concord Grape Walnut Conserve, from her new(ish) book Well-Preserved. The sprouts and beans we didn't eat immediately were pickled -- sprouts blanched and beans raw-packed -- with a "dilly bean" brine recipe. All the jars are now satisfyingly lined up on the shelves in my family room, along with the cauliflower, pears and apples I put up with produce from the market.

The beans were from One Seed Chicago -- in the early spring, my toddler recieved a handful of seeds in a newspaper twist at the Garfield Park Conservatory. I gave him a square foot of one of my raised beds, and the beans took off skyward. The old cable and phone lines that riddle the west-facing back wall of my house were the ideal trellis. Most of the beans within his 3-foot reach went straight into his mouth while standing in the backyard. That one square foot of raised bed, almost unwatered this entire summer, managed to put green beans on our plates once a week for the entire summer. Of course, since the "summer" started in late July this year, I can't say it was a very long season.

The canning process was, as usual, less work than I thought. "Less arduous" is actually what I mean, because it did take up a whole day. Both this weekend and last have been chilly, however, and hours of standing near large boiling pots of water were not unwelcome. I love seeing all of my beautiful jars lined up on my shelf. I am loathe to open any as this would disturb the symmetry of my display. I will be brave and do it at some point, but for now I just want to look at them. The only thing missing is strawberry jam. This was our first year of the strawberry beds, and we ate them all straight off the plants. I didn't even make one cobbler or pie! My kid would go out every morning and check the beds -- any berry remotely close to ripeness was quickly plucked and shoved rapturously into his chubby toddler cheeks. For a few weeks, the growth outpaced him and I was able to collect a quart. I stuck them in the fridge overnight and tried to pawn them off on him at breakfast but one taste and he pronounced them "bad strawbabies" and insisted on going outside to get better ones. I take it as a small victory that I have produced a strawberry snob in inner-city Chicago.

The canning spirit had inspired my inner French peasant, so I decided this was also the time to examine my stock of homemade liqueurs. I was initially turned on to this craft by the French Farmhouse Cookbook by Susan Herrmann Loomis. Well, I knew about it before then....in my travels to Mexico and Bolivia all it took was a few minute conversation with someone in the countryside and I was invariably invited to step over to their house to sample some homemade brew. I had even tried to make limoncello when I was living in New York, but it ended up being weakly-lemon-flavored cheap vodka. But Loomis' recipes looked promising and delicious, and since then, no dinner party of mine has been complete without pulling out a bottle or two of some digestif for my guests. Hostess that I am, my demand has outstripped my supply: my Quince Eau-de-Vie was finished a few months ago, and now I am left with a scant cup each of Thyme Liqueur and Vin d'Orange. So, I have started a new bottle of the Thyme Liqueur, especially since my thyme plants have threatened to completely take over my herb garden. I am also trying a head-to-head battle of the recipes for Liqueur 44. Liqueur 44 is a French orange-and-coffee cordial. Loomis has a Vodka-based recipe and Saveur recently printed a rum-based recipe. I have made a jar of each and in 44 days, I will sample and report the winner.

For now, here is the recipe for the Thyme Liqueur, adapted from Loomis. It is a good use for end-of-season herb plants, although technically one should probably pick the thyme at the peak of summer flavor, preferably in early morning. I will leave that to the purists, and for myself I will have this mellow herbal taste of early autumn. Hmmm...mellow only if you let it sit for four or six months....freshly made it can "bend a nail", as Loomis writes.

Thyme Liqueur

Thick handful of thyme sprigs, washed and spun dry
1 quart vodka
1 quart water
3/4 c sugar

1. Pack the thyme into a 1 quart jar that will close airtight. Pour the vodka over and close well. Shake and then let sit in a dark cool place for a month.

2. Strain the mixture and discard the thyme.

3. Bring the water and sugar to boil and stir over medium heat until the sugar is dissolved. Remove from the heat and let cool.

4. Blend the thyme essence and the sugar syrup together in a 2 quart jar. Let sit for another month. The liqueur will get more mellow and better with age.